
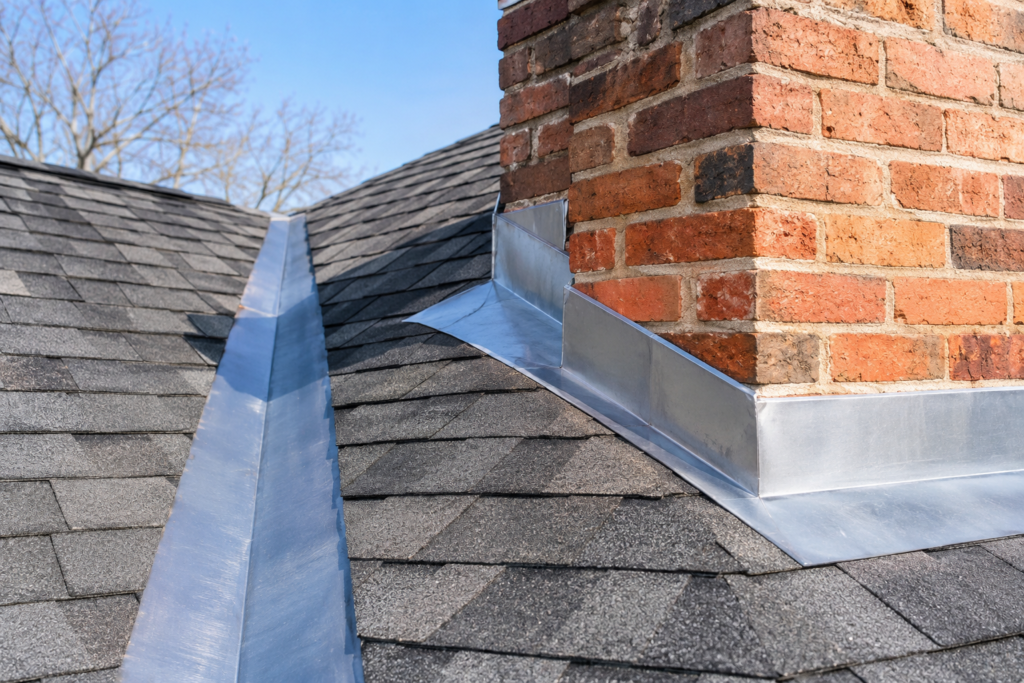
A roof does more than cover your home. It protects your family, belongings, and building structure from rain, snow, wind, and changing temperatures. However, even a well-built roof has certain areas where water can enter if they are not properly protected. These areas include chimneys, roof valleys, walls, vents, and roof edges.
One important material helps protect these vulnerable spots: roof flashing.
Roof flashing consists of thin pieces of metal or other approved materials installed where different parts of a roof meet. Its main purpose is to direct water away from joints and openings so moisture does not reach the roof deck or the inside of your home.
Although flashing may seem like a small part of the roofing system, it plays a major role in keeping your home dry. Poorly installed flashing can allow water to enter even when the shingles look perfectly fine.
For homeowners considering roofing Rochester Hills mi, understanding roof flashing can help them make better decisions when planning a new roof installation or replacement.
Let’s explore how roof flashing works, where it is used, and why proper installation matters.
What Is Roof Flashing?
Roof flashing is a protective material installed at areas where water may collect or enter the roofing system. It is commonly made from metal, such as aluminum, galvanized steel, copper, or stainless steel.
These materials are shaped to fit specific parts of the roof. Some flashing pieces are flat, while others are bent into special shapes to cover corners, joints, and edges.
The main purpose of flashing is to guide rainwater away from vulnerable areas and toward the gutters or other drainage paths.
Think about the point where a chimney meets a roof. The shingles cannot create a completely sealed connection around the brick structure by themselves. Flashing provides an additional layer of protection at that joint.
The same idea applies to roof valleys, wall intersections, skylights, and roof edges.
Why Is Roof Flashing Important?
Water follows the path of least resistance. If there is an opening between roofing materials, rainwater may find its way inside.
Properly installed flashing helps:
- Direct rainwater away from roof joints.
- Protect areas around chimneys and vents.
- Prevent water from entering roof valleys.
- Protect roof edges and connections.
- Reduce moisture exposure to roof decking and framing.
- Support the overall performance of the roofing system.
Flashing is not simply an extra piece of metal. It is an important part of the complete roof water-management system.
Different Types of Roof Flashing and Where They Are Used
Not every part of a roof has the same shape or water-flow pattern. That is why different types of flashing are used in different locations.
Understanding these types can help homeowners recognize the important details involved in a professional roofing installation.
1. Chimney Flashing
Chimneys are among the most important areas to protect because they extend through the roof surface.
The space where the chimney meets the roof creates several joints where water can enter. Rainwater may also flow down the brick surface and collect around the base of the chimney.
Chimney flashing creates a protective connection between the roofing material and the chimney structure.
A typical chimney flashing system includes several components:
Step flashing: Individual metal pieces installed along the sides of the chimney. Each piece overlaps with the surrounding shingles to guide water downward.
Apron flashing: Installed along the lower side of the chimney, where the roof slopes away from the brick structure. It helps direct water onto the roof surface.
Counterflashing: Installed over the upper edge of the base or step flashing. It helps protect the connection between the metal flashing and the chimney masonry.
Cricket or saddle flashing: A raised, sloped structure installed behind wider chimneys. It divides the flow of rainwater and directs it around the chimney instead of allowing water to collect behind it.
All these components work together to create a more reliable water-shedding system around the chimney.
2. Roof Valley Flashing
A roof valley is the area where two sloping roof sections meet. These sections create a channel that carries water toward the lower part of the roof.
Because roof valleys collect water from two different surfaces, they can experience more water flow than other areas.
Valley flashing provides additional protection along this channel.
There are several common valley designs.
Open valley: Metal flashing remains visible between the roofing materials. This creates a clear channel for rainwater to flow down the roof.
Closed-cut valley: Shingles from one roof section extend across the valley, while shingles from the other section are cut back to create a clean line.
Woven valley: Shingles from both roof sections overlap and weave together through the valley. This approach is suitable only for roofing materials and installation systems that allow it.
The right valley design depends on the roofing material, roof slope, manufacturer instructions, and local building requirements.
A properly designed valley helps move water toward the gutters without allowing it to enter the roof deck.
3. Drip Edge Flashing
Roof edges are another area where water needs proper direction.
Drip edge flashing is a metal strip installed along the edges of a roof. It helps guide rainwater away from the roof deck and toward the gutters or beyond the edge of the roof.
It also provides a finished appearance along the roofline.
Drip edge is generally installed at two main locations:
Eaves: The lower horizontal edges of the roof, where rainwater flows toward the gutters.
Rakes: The sloping edges along the sides of a roof.
Without suitable edge protection, water may reach the roof decking or fascia boards. Over time, repeated moisture exposure can contribute to wood deterioration.
4. Step Flashing
Step flashing is commonly used where a sloped roof meets a vertical wall.
It consists of small L-shaped metal pieces installed in layers along the roof-to-wall connection.
Each piece overlaps with the next, creating a path that directs water down and onto the roof surface.
Step flashing is especially important around:
- Dormer walls
- Side walls
- Chimney sides
- Other vertical roof intersections
The pieces must be integrated correctly with the shingles and wall materials. Poorly positioned flashing can allow water to move behind the exterior wall covering.
5. Vent Pipe Flashing
Most homes have plumbing vents and other pipes that extend through the roof.
Each opening creates a potential path for water to enter. Vent pipe flashing is designed to protect the area around these pipes.
A common vent flashing system includes a metal base with a raised collar or a compatible flexible boot that fits around the pipe.
The base is integrated with the surrounding shingles so water flows over the flashing rather than underneath it.
The material should also be suitable for the pipe size, roofing type, and expected weather conditions.
How Does Roof Flashing Protect Your Home From Water?
Roof flashing works by controlling the direction of water.
Instead of allowing rainwater to enter joints or openings, flashing creates a surface that guides it toward safer drainage areas.
Here is how this protection works in different situations.
Directing Water Away From Roof Joints
The joints between roofing materials are natural weak points.
For example, where a roof meets a chimney, the shingles cannot cover the entire connection. Flashing fills this gap and helps create a water-shedding transition.
The overlapping design allows water to flow over the materials instead of entering the spaces underneath.
Protecting the Roof Deck
The roof deck is the structural surface underneath the shingles.
It is commonly made from plywood or oriented strand board. When moisture repeatedly reaches this surface, it can lead to swelling, deterioration, and other problems.
Flashing helps reduce the amount of water that reaches the roof deck around vulnerable openings and intersections.
Supporting Proper Drainage
A roof is designed to move rainwater from higher areas toward the lower edges.
Flashing supports this process by directing water around chimneys, through valleys, and toward gutters.
When each section is installed correctly, water can follow a clear path off the roof instead of collecting around joints.
Reducing the Risk of Interior Water Damage
Water that enters through a roof opening may eventually reach the attic, insulation, ceilings, or walls.
Proper flashing helps reduce this risk by protecting the areas where roofing materials meet other structures.
It works alongside shingles, underlayment, roof decking, and gutters to provide complete exterior protection.
What Happens When Roof Flashing Is Installed Incorrectly?
Even high-quality flashing may not provide reliable protection if it is installed incorrectly.
Small mistakes can create openings that allow water to enter the roof system.
Some common installation problems include:
Incorrect Overlapping
Flashing pieces should overlap in a way that follows the natural direction of water flow.
If the pieces are arranged incorrectly, water may move behind them instead of flowing onto the roof surface.
This is particularly important around chimneys and roof valleys.
Poor Chimney Flashing Connections
Chimney flashing needs to connect properly with both the roofing material and the chimney masonry.
If counterflashing does not cover the upper edge of the underlying flashing correctly, water may enter the joint.
The connection between the metal and masonry also needs to follow suitable installation details.
Missing or Poorly Installed Drip Edge
Without proper drip edge protection, rainwater may reach the roof decking and fascia.
This can increase moisture exposure around the roof perimeter.
Incorrect Sealant Application
Sealants may be used at certain flashing connections, but they should not replace proper metal flashing design and installation.
Depending on the location, relying only on exposed caulk or roofing cement may create a weak point as materials expand, contract, and age.
A properly designed flashing system should depend on correct layering and water-shedding details rather than sealant alone.
Signs Your Roof Flashing May Need Attention
Homeowners may not be able to see every flashing detail from the ground, but certain signs can suggest that something is wrong.
Look for these common warning signs:
Water stains on ceilings: Brown or yellow marks near exterior walls or ceilings may indicate that water is entering through the roof.
Moisture around the chimney: Damp areas or visible water marks near the chimney may suggest problems with the flashing connection.
Loose metal pieces: Flashing that appears lifted, bent, or separated from the surrounding materials may no longer provide reliable protection.
Water entering the attic: Damp insulation, wet wood, or water marks inside the attic can point to a roof opening.
Rust or corrosion: Metal flashing exposed to weather for many years may develop corrosion, depending on its material and protective finish.
Water collecting near roof valleys: Poor drainage or debris buildup may affect how water moves through these areas.
These signs do not always mean the flashing itself is responsible. Roof age, shingle condition, gutters, and other exterior components can also affect water management.
A professional roof inspection can help determine the condition of these areas.
Why Roof Flashing Matters During a Roof Replacement
A roof replacement is an important opportunity to evaluate the flashing throughout the roofing system.
Even if the existing shingles are removed and replaced with new materials, old flashing may still be present underneath or around important roof connections.
If the flashing is worn, corroded, poorly installed, or incompatible with the new roofing system, keeping it may affect the performance of the new roof.
During a roof replacement, homeowners should discuss the following details with their contractor:
- Will the existing chimney flashing be evaluated?
- Will new valley flashing be included where needed?
- Will drip edge be installed along the appropriate roof edges?
- Are the roof-to-wall connections properly protected?
- Will vent pipe flashing be compatible with the new roofing materials?
- Are all flashing details consistent with manufacturer instructions?
The goal is to make sure that the new roofing materials and flashing work together as one complete system.
How Michigan Weather Makes Roof Flashing Important
Rochester Hills homeowners experience different weather conditions throughout the year.
Heavy rain, strong winds, snowfall, ice, and seasonal temperature changes can all affect roofing materials.
These conditions make proper flashing installation especially important.
Heavy Rain and Wind
Strong winds can push rain toward roof joints and openings from different directions.
Flashing helps protect these areas by directing water away from vulnerable connections.
Snow and Ice
Snow can collect in roof valleys and around chimneys. During changing temperatures, melting snow may move across the roof and refreeze near colder edges.
Properly designed flashing, along with suitable ice and water protection, helps manage water in these areas.
Seasonal Temperature Changes
Metal and roofing materials expand and contract as temperatures change.
Flashing must be selected and installed with these conditions in mind. Proper fastening and compatible materials help the roofing system handle normal movement without creating unnecessary gaps.
For homeowners considering roofing Rochester Hills, these weather conditions make installation quality just as important as the shingles selected for the project.
What Should Homeowners Ask a Roofing Contractor About Flashing?
Before choosing a contractor for a roof installation or replacement, it is helpful to discuss the details of the flashing system.
Here are some useful questions:
- What type of flashing will be used around my chimney?
- Will the roof valleys have metal flashing or another approved valley system?
- Will drip edge be installed along the eaves and rakes?
- How will the roof-to-wall connections be protected?
- Are the flashing materials compatible with the selected shingles?
- Will the installation follow the manufacturer’s instructions?
- How will the contractor handle water drainage around roof openings?
These questions can help you understand what is included in the roofing estimate.
When comparing a roofing company Rochester Hills homeowners should look at more than the total project cost. Material quality, installation methods, flashing details, and workmanship are all important factors.
A contractor should be able to explain how the complete roofing system will protect the home.
Choosing the Right Roofing Company in Rochester Hills
Selecting a contractor is an important step when planning a new roof.
Homeowners should look for a company that understands the complete roofing system, including shingles, underlayment, flashing, ventilation, and water drainage.
A reliable contractor should also explain the materials being used and how important roof connections will be handled.
When researching rochester hills roofing services, consider the following:
- Experience with residential roof installation and replacement.
- Knowledge of different roofing materials and flashing systems.
- Clear project estimates and explanations.
- Proper installation practices.
- Manufacturer-approved materials.
- Good communication throughout the project.
You can also compare several estimates to understand what each company includes.
If you are searching for a preferred roofing company Rochester homeowners can consider, focus on workmanship, material quality, customer communication, and the company’s experience with complete roofing systems.
The right choice should give you confidence that the roof is designed to manage water effectively and protect your property for years.
Final Thoughts: Small Flashing Details Make a Big Difference
Roof flashing may not be the most visible part of your home’s exterior, but it performs an important job.
It protects vulnerable areas around chimneys, roof valleys, walls, vents, and edges by directing water away from openings and joints.
When flashing is properly selected and installed, it works with shingles, underlayment, and gutters to support a complete roofing system.
For homeowners planning a roof replacement, paying attention to flashing details can help improve long-term roof performance.
A strong roof is not only about choosing attractive shingles. It is also about making sure every connection and water-shedding detail works as intended.
Choose Prime Home Remod for Your Roofing Project
A dependable roofing system starts with quality materials and careful installation. From shingles to flashing and roof edges, every component plays a role in protecting your home.
Prime Home Remod provides professional roofing installation and roof replacement services for homeowners in Rochester Hills and surrounding Michigan communities. With a family background of more than 70 years in building experience, the company focuses on quality craftsmanship and exterior home improvements.
If you are planning a new roof for your home, contact Prime Home Remod to discuss your roofing needs and explore the available installation and replacement options.
Frequently Asked Questions
What is roof flashing used for?
Roof flashing is used to direct water away from vulnerable areas of a roof. It protects joints around chimneys, valleys, walls, vents, and roof edges from water entering the roofing system.
What material is commonly used for roof flashing?
Roof flashing is commonly made from aluminum, galvanized steel, copper, and stainless steel. The right material depends on the roofing system, environmental conditions, and manufacturer recommendations.
Does every roof need flashing?
Yes. Roofs need suitable flashing at important intersections, penetrations, and edges. The exact flashing design depends on the roof’s shape, materials, and construction.
Why is chimney flashing important?
Chimney flashing protects the connection between the chimney and the roof. It directs water away from the masonry and surrounding roofing materials, helping reduce the risk of leaks.
What is the purpose of valley flashing?
Valley flashing protects the channel where two roof slopes meet. Since these areas collect water from multiple roof sections, proper flashing helps direct the water toward the lower roof edge.
What does drip edge flashing do?
Drip edge flashing is installed along the roof perimeter. It helps direct water away from the roof decking and fascia and toward the gutters or beyond the roof edge.
How long does roof flashing last?
The lifespan depends on the material, installation quality, weather exposure, and surrounding roofing system. Copper and stainless steel can offer long service lives, while other metals may have different durability characteristics.
Can new shingles be installed over old flashing?
Sometimes existing flashing can remain if it is in good condition and suitable for the new roofing system. However, the contractor should evaluate its condition, compatibility, and installation details before making that decision.
Does roof flashing prevent all leaks?
No roofing component can guarantee that leaks will never happen. Proper flashing significantly reduces the risk of water entering vulnerable areas, but the entire roofing system must be correctly installed and maintained.
Should flashing be replaced during a roof replacement?
Flashing should be evaluated during every roof replacement. Damaged, corroded, poorly installed, or incompatible flashing may need to be replaced to support the performance of the new roofing system.

